Now that you know which
stamps you may want to use, you will need to know about the other tools that
you will need to have to both carve and stamp leather. I mentioned two of them
that you would need, but I failed to tell you about the third. In order to
stamp leather a mallet is required to perform the task of stamping. There are
tools that you can substitute for a mallet, but I will tell you about those in
a later post.
In order to carve leather
you will need a swivel knife. A swivel knife is the age-old standard for
carving leather. You will see in the photo below that a swivel knife has a yoke
at the top with a barrel that is able to swivel as needed while carving. The
barrel is knurled to make it easier to grip and rotate as you are carving. When
purchasing a swivel knife you want to get one that is adjustable to fit the
size of your hand. Notice that there is a locking nut at just above the barrel
that allows the user to set the adjustment so that it doesn’t move while using.
 |
| Basic swivel knife with special art blade |
The swivel knife is used
by placing the barrel between your thumb and middle finger with your index
finger over the yoke. Place the index finger on the yoke at the first joint.
Rotate the barrel back and forth to see how freely it moves back and forth. If
it is difficult to move you might want to try putting a very small drop of
light oil, such as sewing machine oil, where the yoke attached to the threaded
stem of the swivel knife.
I will post photos or
illustrations, that is if I am able to sketch them out, of how to use a swivel
knife. More detail of preparation and protection of your swivel knife will also
be discussed. You will find that you might have a favorite stamp to use, but
you will pretty much find that you will live and die by the swivel knife. One
thing that you don’t want to do is drop your swivel knifed blade-down on a
concrete floor. I have done that before and it wasn’t pretty. I spent a couple
of hours getting the blade back to where I could use it.
Another simple tool that
you will want to have is a ballpoint stylus for transferring the pattern from
the paper to the leather. I prefer a smaller tip on the stylus because it will
give a crisper line. Leather tool sets will sometimes have a ball point stylus
included, but if not, go to your nearest craft store or the craft department of
a large store to find one.
 |
| Ballpoint stylus closeup. |
The third tool that you
will want to have is a mallet. There are various mallets available for
purchase, being made from wood, rawhide, or a polyethylene type of material. I
would use a slightly heavier mallet when stamping the leather. That is because
having to double-tap your stamp to get a good impression can cause the stamp to
chatter on the leather. Most of the time you will be able to correct a stamp
chatter, but it will add time to the process.
The photos below show
three different types of mallets that are available at the places where leather
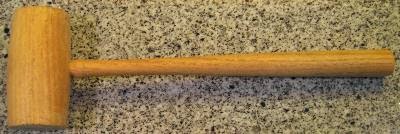
stamps can be purchased. The first and probably least expensive is the wood
mallet. Most of the wood mallets that I have seen are very light weight and do
not fit my style of stamping. The second is the poly mallet which will have
more weight and will give you a good depth of stamp when used properly. The
poly mallet can also be used with rivet and snap setting tools without fear of
breaking. The rawhide mallet is the most expensive. It is made of rawhide which
is wrapped around itself in layers to give the mallet head more mass or weight
when stamping. Rawhide mallets come in various weights with the price going up
as the weight goes up. Also, as the weight goes up, the size of the mallet head
increases. I have used a large rawhide mallet for years but I found it very
cumbersome and visually impairing.
 |
| Small wood mallet |
 |
| Poly mallet |
 |
| Rawhide mallet |
More to come on the next
post.
Have fun!
This comment has been removed by a blog administrator.
ReplyDelete